Bathroom Upgrade
- Brandi
- Mar 19, 2023
- 3 min read
My builder grade bathroom needed some upgrading and so I got to work with DAP to give this space some love. The major changes were adding tile, a wooden arched frame and a niche. We also upgraded the faucet, added hardware, new towel hooks and light fixture (phew). I am so happy with how it turned out.


Tiling the upper half of the wall was the first task. I used this stuff called Mussel Bond and it made it so easy to place the tile on the wall. It replaces having to use mortar. After setting all the tile I used SimpleFix ready made grout. Then I caulked using DAP Kwik Seal Caulk, tub & tile adhesive caulk.


Mussel Bond / Tile Cutter / Caulk Gun / Tile / Light / Caulk / DAP Kwik Seal / SimpleFix Grout

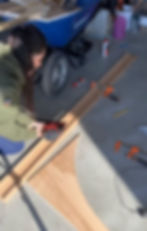
Next up I worked on framing out our existing mirror. I grabbed some 3/4 Inch plywood and traced an arch to cut out with my jigsaw using a super fine finish blade from spider. Once I cut out the first arch I used that to trace the opposite side.

To create the header I used one 1 x 4 and two 1 x 2 pieces of Alder wood. I then glued them together using DAP wood glue and then brad nailed them together. For the two arch pieces I added two pocket holes on each, in the back, glued and screwed them into the header.
For the finishing touch I added a braided trim, glued and pin nailed it into place. Then I filled all the holes with DAP Plastic Wood and sealed the wood.


DAP Wood Glue / Wood / DAP Caulk / Miter Saw / DAP Plastic Wood / Pin Nailer / Brad Nailer

Last step in my bathroom upgrade was niche.

I started by cutting out a piece of the wall between the studs with my jigsaw making sure that the blade attached is short enough to not puncture the wall on the other side.

I then framed out the niche by attaching some 1 by 4's to the studs that were inside the wall. I did this by creating pocket holes and screwing them in. I used a scope and made sure before I did this that there were no wires behind. This frame will allow me to screw drywall to frame out the niche. I used the piece of drywall that I cut out for the back of the niche. I then glued it with some DAP glue and placed a few screws into the wall to keep in place. I did the same for the sides with new drywall.

Once all the new drywall was in place I used corner beads and spread DAP DryDex Joint Compound all over to fill gaps and make it all smooth. I love the DAP DryDex because it goes on pink and dries white so you know when it is done. It took about 2-3 coats to cover all the corner beads and to smooth and feather everything out nicely.

Once everything was dried I sanded, primed and painted. I then cut out wood shelves for inside the niche. For the shelves I added a little cleat on the back to hold up the back. With a pin nailer I attached the front to the wall.
Ta-da! I love how everything has turned out and I couldn't have done it without DAP's amazing products.


Jigsaw / Kreg Pocket-Hole Jig / DAP DryDex Joint Compound / DAP Wood Glue / Miter Saw / Scope / Drill / Corner Bead / Pin Nailer

Mouthwash Jars / Rug / Ceiling Light / Vanity Light / Clock / Wire Drawers